Print the Panoptica Floor Marker PDF and place it in the space where you will complete the model review.
iPad Guide

Getting Started

Setup

Setup
Ensure your iPad OS is up-to-date and download the app from the App Store by scanning the QR code with your camera.

Logging in
Open the app and press CHANGE SERVER to enter your specified server URL. Next press LOGIN or LOGIN as GUEST. If you choose to log in as a guest, enter your email address and provided PIN code, and press LOGIN to proceed.
Note: if left unchanged, the default server will connect to the Panoptica Demo environment.

Logging in
Log in with your email address and password if you have a known Auth0 user account on the specified server.
Note: Use the login method that your company has recommended to you, such as Google G Suite.
Logging in
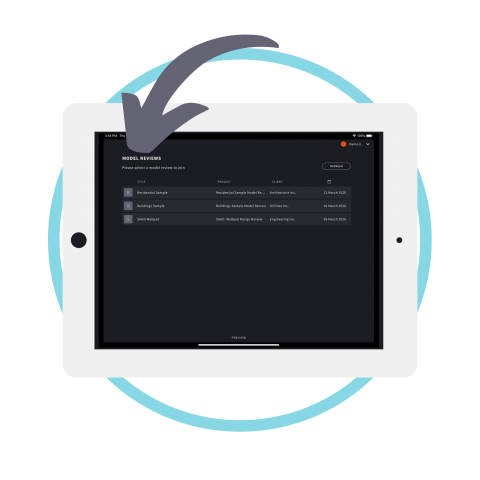
After waiting a moment to be logged in, you will be redirected to the list of model reviews you have been invited to.
Select a model review and press CONFIRM to enter.

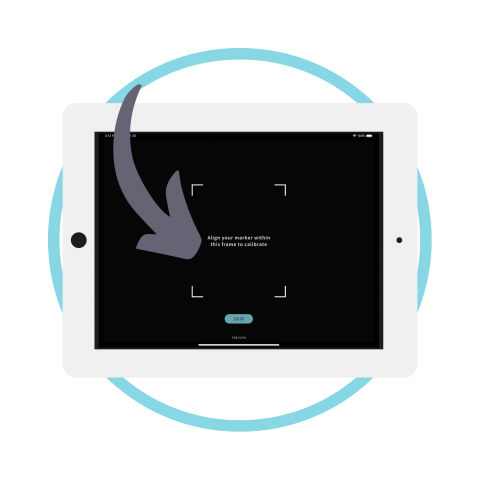
Calibration
If it is your first time joining this model review, you will be prompted to calibrate. Calibration anchors the model to the Panoptica floor marker and allows you to walk around the model.
With the iPad, scan the Panoptica floor marker.

Enter a scene
After calibrating, you will start in the model review’s Lobby.
To enter a scene in the model review, select the scene from the main menu to reveal Spawn Points that can be jumped to in that scene. Next, press any of the Spawn Points.
After the scene has loaded, you will find yourself at the selected Spawn Point and are now ready to review the scene.

Enter a scene
Note: Smaller rooms, or rooms with a lot of furniture may make the model appear smaller. While appearing smaller, walking the model will still be in 1:1 size.

Controls

Moving Around the Scene
The scene’s anchor is set to the location of your Panoptica floor marker when a calibration is completed. The scene will remain stationary around this point. Walk around with the iPad to navigate through the scene; the iPad’s screen is your window into seeing the model.

Selecting Objects
To select objects in the scene, tap the object on your iPad. You will see your selection arrow appear on the object.

User Interface

Scenes Tab
Use the Scenes tab to go to different Spawn Points or a new scene. Spawn Points are different locations within a scene that you can instantly move to.
A Lobby is a scene that is a miniaturized version of the entire project featured in the model review. To go back to the Lobby, press GO TO LOBBY.
Tasks Tab
Use the Tasks tab to monitor and check off tasks created for your model review. Selecting a task will bring up a more detailed view, where you can see who has also checked off the task, and if it is assigned to anyone specific. Press CHECK OFF to complete the task.

Participants Tab
Use the Participants tab to follow other users that are in your model review.
To follow someone, press FOLLOW by the user’s name. Upon following another user, your scene and spawn point will change to be theirs, as will any offset they apply to their scene. You can unfollow, by pressing FOLLOWING.
This is useful for allowing a team lead to ensure everyone is with them, for example, especially when reviewing multiple scenes and traversing multiple spawn points.

Hiding the Main Menu
To hide the main menu, press the < button. This allows for a larger area to see during your model review.
To bring the main menu back, simply press the button in the top-left corner of the screen when the main menu is hidden.

Offset
You can move the scene around in small increments by pressing the OFFSET button near the top-right corner of the screen. Press the buttons beside your desired axes to adjust the scene in metres or degrees. Use the RESET button to set the values back to 0.0.
Note: if you have others following you while adjusting offset, they will see the scene move, too.
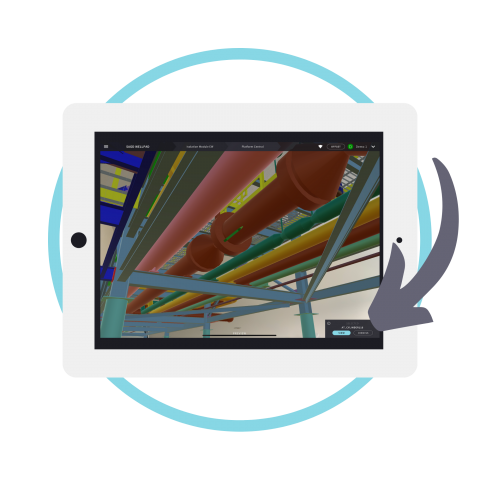
BIM Data
BIM data can be viewed on selected objects. First, select an object so your selection arrow is visible, then press the VIEW button on the bottom-right corner of the screen.
Any BIM data attached to this object will be visible on the right side of the screen.

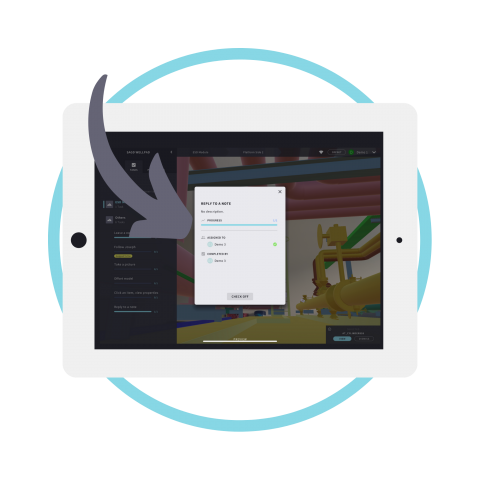
Creating Notes
Text and photo notes can be left in the scene to record findings and opinions in your model review.
To create a note, first select an object, and then press LEAVE A NOTE button on the bottom-right corner of the screen. This will bring up a pop-up, where you can create a text note or take a photo for others to see.
Once created, your selection arrow will be replaced with a note icon. Other participants can see your note and create a thread, by using the text box and photo button there.
Recalibration
You can recalibrate your iPad at any point while in a model review. Press your name in the upper right corner, to show the menu and press the CALIBRATE button.The calibration screen will reappear and prompt you to calibrate.
With the iPad, scan the VizworX floor marker. A success message will appear and you will be back in the scene you were just in. If you press the SKIP button, a notification message will appear and the scene will remain unchanged
FOR MORE INFORMATION
Download a PDF copy of the information above. Our guides are tailored to your specific demo needs.